What is embellishment?
Embellishment = adding a visual effect to printed material beyond standard printing.
Good to know:
- Embellishment can be applied to both sides of paper
- Varnish / foil must not interfere with the safety zone of 2,5 ~ 5 mm from the fold or cut
- Minimum thickness of material – 200 g/m²
- Maximum thickness of material – 450 g/m²
Two main options:
- Metalic Foil (gold, silver) – metallic gloss
- Partial Varnish – glossy layer in selected places
When to use:
Ideal for book covers or other printed materials where such special visual effects can stand out.
How Partial Varnish and Metallic Foil differ from 3D Partial Varnish and 3D Metallic Foil
Before preparing data, you need to decide what type of embellishment you want:
Partial Varnish / Metallic Foil
- Lower relief
- Finer details
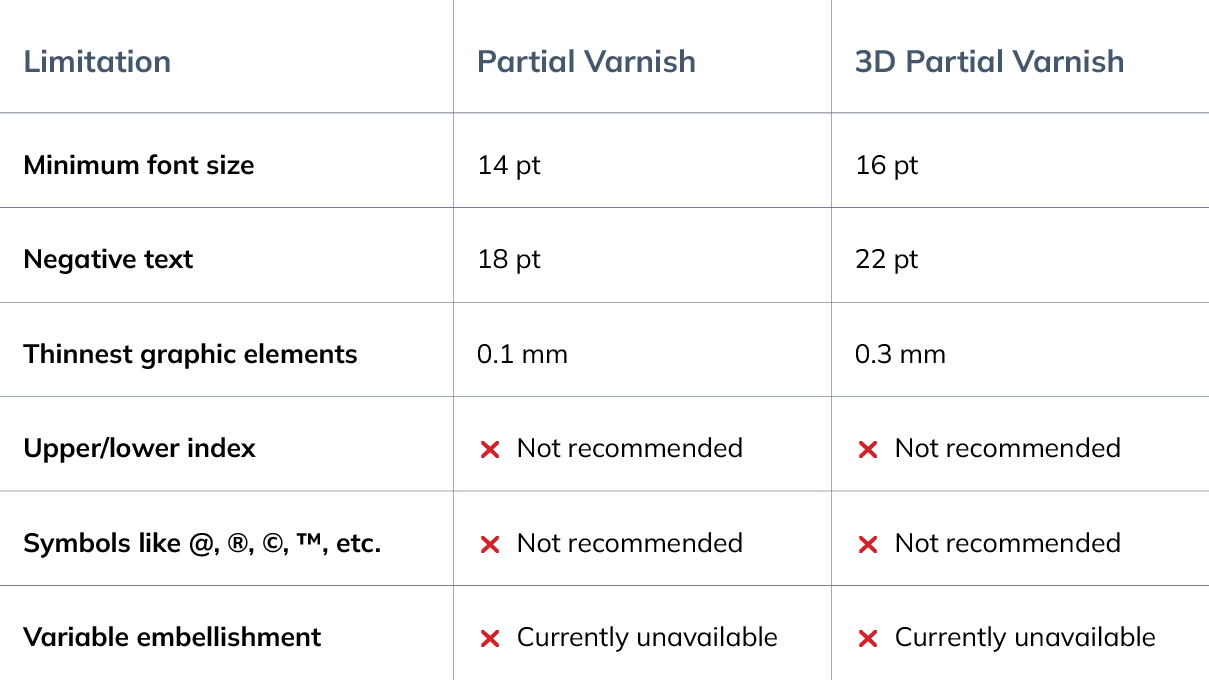
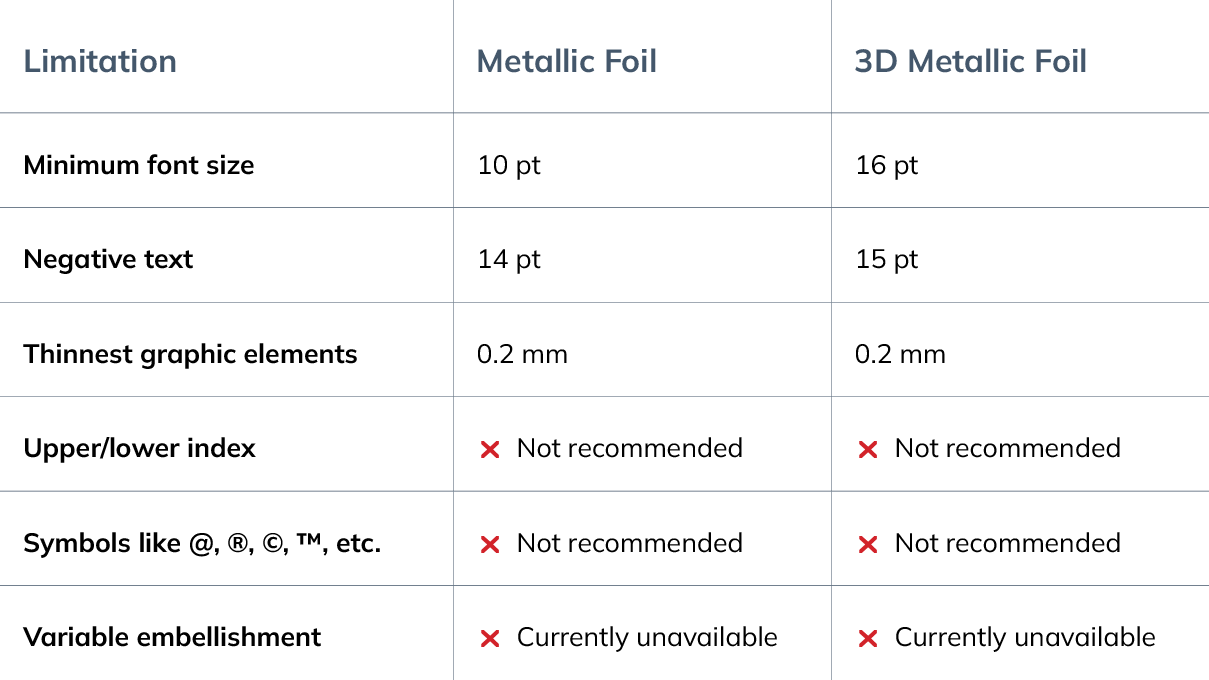
- The minimum font size that allows embellishment with varnish is 14 pt, and 16 pt for embellishment with metallic foil
- Partial Varnish graphics must not be thinner than 0.15 mm
- Lines for embellishment with foil must not be thinner than 0.8 mm
- A more affordable solution
3D Partial Varnish / 3D Metallic Foil
- Distinctive relief
- Thicker limitations (high risk of varnish merging in small gaps)
- The minimum font size that allows embellishment is 16 pt
- Partial Varnish graphics must not be thinner than 0.3 mm
- Lines for embellishment with 3D foil must not be thinner than 0.8 mm
- A more expensive solution
Type 1: Partial Varnish
What you need to know
Partial Varnish = glossy layer only applied to selected areas of printed material.
Effect:
- Contrast between matt paper and glossy varnish
- Highlighting of text, logos, images
- A more subtle effect than foil (but still distinctive to the eye and touch)
Limitations:
- The foil must not extend beyond the cut or fold – may cause the varnish to crack.
- Not possible to embellish the entire surface of the printed material
Types:
- Partial Varnish – subtle gloss
- 3D Partial Varnish – distinctive relief
Graphics preparation: Partial Varnish (step by step)
Step 1: Prepare your basic print graphics
Your file in Adobe InDesign / Illustrator /PDF with complete graphics for printing (CMYK, cut, correct resolution, etc.). For details on how to prepare data for printing click here.
Step 2: Create a new layer
Separate the areas to be covered with varnish (logo, text, etc.) into a separate layer.
Step 3: Set Spot Color
For Partial Varnish:
- Swatch Name: spot_gloss
- Color Type: Spot Color
- K: 100%
For 3D Partial Varnish:
- Swatch Name: spot_gloss_3d
- Color Type: Spot Color
- K: 100%
Step 4: Set Transparency
IMPORTANT: Set the following for all Partial Varnish objects:
Window → Effects → Transparency → Blending Mode: Multiply
NOT Overprint! – causes errors during subsequent processing
Step 5: Add a note
Please add a note saying that the graphics contains partial varnishing and information about its location.
Limitations for Partial Varnish (IMPORTANT!)
Exception for index:
From a height of 20 mm of the main text, it is possible to make upper and lower indexes.
Negative varnishing:
What is it?
Negative varnishing = the varnish covers the whole surface, except certain areas (e.g. the text is not varnished, only the background).
How to prepare this?
- Create an object with a spot colour (spot_gloss or spot_gloss_3d)
- Remove graphics (text, logo, etc.) from the object (cut out)
- It must not be covered with a white or other coloured layer (causes errors in the preview)
Limitations:
- Negative text must be at least 18 pt (Partial Varnish) or 22 pt (3D Partial Varnish)
Type 2: Metallic Foil (gold, silver)
What you need to know
Foils:
- Gold
- Silver
Limitations:
- It is not possible to combine multiple foils on a single printed material (e.g. gold + silver)
- The foil must not extend beyond the cut or fold – may cause the varnish and foil to crack
- Not possible to embellish the entire surface of the printed material
Types:
- Metallic Foil – finer relief
- 3D Metallic Foil – distinctive relief
Graphics preparation: Metallic Foil (step by step)
Step 1: Prepare your basic print graphics
Your file in Adobe InDesign / Illustrator /PDF with complete graphics for printing (CMYK, cut, correct resolution, etc.). For details on how to prepare data for printing click here.
Step 2: Create a new layer
Separate the areas to be covered with foil (logo, text, etc.) into a separate layer.
Step 3: Set Spot Color
For Metallic Foil:
- Swatch Name: spot_metallic_foil
- Color Type: Spot Color
- K: 100%
For 3D Metallic Foil:
- Swatch Name: spot_metallic_foil_3d
- Color Type: Spot Color
- K: 100%
Step 4: Set Transparency
IMPORTANT: Set the following for all Partial Varnish objects:
Window → Effects → Transparency → Blending Mode: Multiply
NOT Overprint! – causes errors during subsequent processing
Step 5: Add a note
In the file note (or when ordering), please specify, for example:
- The graphics contains Metallic Foil (swatch: metalic)
- Foil colour: GOLD / SILVER (select)
Limitations for Metallic Foil (IMPORTANT!)
Exception for index:
From a height of 20 mm of the main text, it is possible to make upper and lower indexes, but there is still a risk of letter bowl flooding.
Checklist before sending
 Swatch Name is correct (spot_gloss, spot_gloss_3d, spot_metallic_foil, spot_metallic_foil_3d)
 Color Type: Spot Color
 K: 100%
 Transparency: Multiply (not Overprint)
 Minimum font/line sizes observed
 Safety zone observed
 Foil/varnish does not extend beyond the cut or fold
 Embellishment not applied to the whole surface
 Comment on embellishment in the order


